Installation / Uninstallation Procedures for Sales Simplicity Software
The following section provides instructions for installing Sales Simplicity.
![]()
* Microsoft Internet Explorer Security Settings must be set first in order for Sales Simplicity to install successfully
Microsoft Internet Explorer Security Settings and Installation Requirements
In order to successfully download and install the Sales Simplicity client-side components, the user login profile on the local system MUST have “Power User” or “Administrator” privileges. If unknown or unable to successfully install Sales Simplicity, please contact your IT (Information Technology) support staff for assistance.
![]()
* Microsoft Internet Explorer security settings must be set for each user system
How to Set Up Internet Explorer Security Settings
Step 1 – Set Up ActiveX Controls
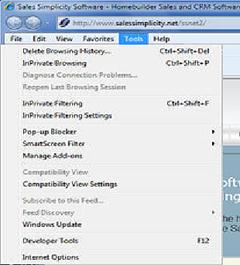
1. OpenInternet Explorer > Tools > Internet Options > Security tab
2. In the Select a Web content zone to specify its security settings list view, click to highlight the Internet and/or Local Intranet (for self-hosting) icon
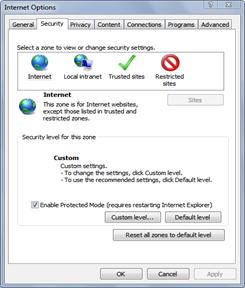
3. Click the Custom Level button
4. The Security Settings pop-up window will be displayed
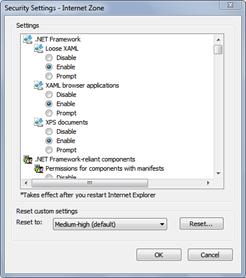
5. In the Settings area, scroll down and search for the ActiveX Controls and Plug-ins section:
· Automatic prompting for ActiveX controls - ¤ Enable
· Binary and script behaviors - ¤ Enable
· Download Signed ActiveX Controls - ¤ Prompt
· Run ActiveX Controls and Plug-ins - ¤ Enable
· Script ActiveX Controls Marked Safe for Scripting - ¤ Enable
6. Scroll down and look for the Miscellaneous section:
· Allow
script-initiated windows without size or position constraints -
¤
Enable
7. Click the OK button
Step 2 – Set Up Trusted Web Site Controls
![]()
* This security settings is OPTIONAL for Internet Explorer 6
* This security settings is REQUIRED for Internet Explorer 7 and higher version
1. OpenInternet Explorer > Tools > Internet Options > Security tab
2. In the
Select a Web content zone to specify
its security settings list view, click to highlight the ![]() Trusted Sites
icon
Trusted Sites
icon
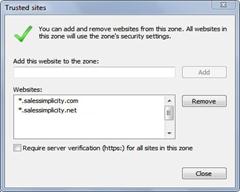
3. Click the Sites… button
4. Un-Check o Require server verification (https) for all sites in this zone
5. For Sales Simplicity Hosting, type – *.salessimplicity.net
(does not apply if Sales Simplicity is self-hosted, type-in your server web URL)
6. Click the Add button
7. For Sales Simplicity Hosting, type – *.salessimplicity.com
(does not apply if Sales Simplicity is self-hosted, type-in your server web URL)
8. Click the Add button
9. For Self-Hosting, type - ________________________________________
10. Click the Add button
11. Click the OK button
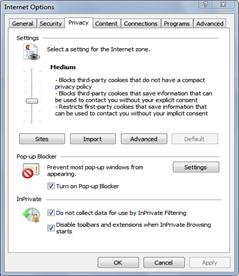
Step 3 – Set Up Cookies and Pop-Up Controls
1. Open Internet Explorer > Tools > Internet Options > Privacy tab
2. In the Settings area, click the Sites… button
3. For Sales Simplicity Hosting, type – *.salessimplicity.net
(does not apply if Sales Simplicity is self-hosted, type-in your server web URL)
4. Click the Allow button
5. For Sales Simplicity Hosting, type – *.salessimplicity.com
(does not apply if Sales Simplicity is self-hosted, type-in your server web URL)
6. Click the Allow button
7. For Self-Hosting, type - ________________________________________
8. Click the Allow button
9. Click the OK button
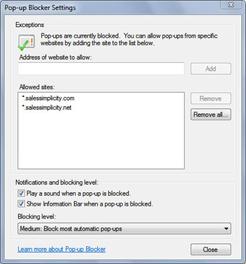
10. In the Pop-Up Blocker area, IF þBlock Pop-Ups is checked, then click the Settings… button
12. Type – *.salessimplicity.net
(does not apply if Sales Simplicity is self-hosted, type-in your server web URL)
11. Click the Add button
13. Type – *.salessimplicity.com
(does not apply if Sales Simplicity is self-hosted, type-in your server web URL)
12. For Self-Hosting, type - ________________________________________
13. Click the Add button
14. Click the Close button
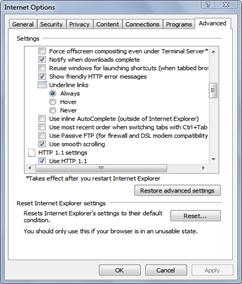
Step 4 – Set Up the FTP Controls
1. Open Internet Explorer > Tools > Internet Options > Advanced tab
2. Un-Check ¨ Reuse Windows for launching shortcuts
3. Un-Check
¨
Use
Passive FTP (for firewall and DSL modem compatibility)
(does not apply if Sales Simplicity
is self-hosted)
4. Click the OK button
How to Install Sales Simplicity Software
Step 1 – Install Sales Simplicity
At the Internet Explorer URL address field, type:
o For Server #1, type - www.SalesSimplicity.net
o For Server #2, type - www.SalesSimplicity.net/ssnet2
o For Self-Hosting, type - ________________________________________

· When the Login link is clicked, the Sales Simplicity installation screen will be displayed
![]()
* Sales Simplicity installation screen will only be displayed during initial software installation and subsequent upgrades
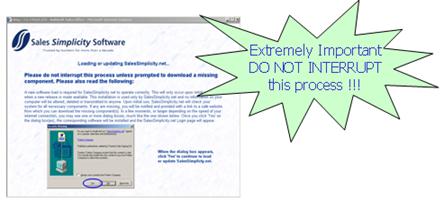
· Can take from 2 to 30 minutes to load, depending on the speed of the system and internet connection
· Initial installation downloads several files approximately 15MB
· May receive 3-9 prompts during download (click Yes or Install)
· This is a one time process, for each system
· Subsequent releases of software enhancements will take less time
· Once the initial installation is complete, the Login screen will be displayed
How to Login to Sales Simplicity
Step 1 – Log In to Sales Simplicity
Enter the Code, User Name and Password, then click the Login button or press Enter on the keyboard.
· After three (3) consecutive unsuccessful log-in attempts, the user profile will be disabled in Sales Simplicity. If this occurs, please contact your Sales Simplicity System Administrator for assistance
· If the user has access privileges to more than one subdivision, then the “Choose Neighborhood” screen will be displayed. First, select the desired Division and then the Subdivision from the drop-down lists
· Click the Continue button or press Enter on the keyboard to logging into Sales Simplicity
Basic Orientation - Universal (Navigation) Rules
The following are helpful rules that are universal throughout the program:
· To add a new record, ALWAYS find the appropriate “New” button
· Required fields are always designated in upright bolded Blue to save
· Never leave
the program by clicking the ![]() in the upper-right corner of the browser window. ALWAYS
click the
in the upper-right corner of the browser window. ALWAYS
click the ![]() button
button
· Concurrent Licensing – each user may be logged in on one machine at a time
(ie: If 100 user profiles were created, only “Available License #” of users can be logged-in at any one time)
· Cannot delete a record, if there are other records ‘attached’ to it
· Be careful
with the ![]() button. If you click
button. If you click ![]() ,
all data entered since the last save will be ‘lost’
,
all data entered since the last save will be ‘lost’
· ![]() Early,
Early, ![]() Often,
Often, ![]() before moving to
next tab
before moving to
next tab
· Try NOT to click too quickly between sections and tabs
(wait for the yellow box to go away)
· Never use hard return [Enter] keyboard function once logged in
· Save Early, Save Often, Save…, Save…, Save…, Save…
How to Uninstall Sales Simplicity Software
If Sales Simplicity Software displays erratic behavior orinstability after new installation or software update, a “Partial Software Uninstall” may fix those corrupted components.
Step 1 – Uninstall Sales Simplicity
1. Closed any Sales Simplicity Software – reports, letters, contractspreview windows
2. Log-out and closed the Sales Simplicity Software, to include the Launch Page window
3. Open Windows Explorer and browse the local system C: drive for “SalesSimplicity” folder
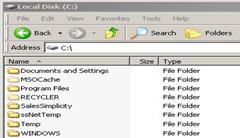
4. IF “SalesSimplicity” folder exist, right click and select delete
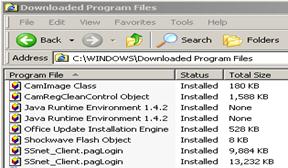
5. For Windows XP or higher version, go to C:\Windows\Downloaded Program Files, go to Step-8
6. For Windows NTsystem, go to C:\WINNT\Downloaded Program Files, go to Step-8
7. For Windows 7 or higher version, go to C:\Windows\Downloaded Program Files, go to Step-9
8. Find the SSNet_Client.pagLoginfile(s), right-click and select Remove
(Do NOT press the Delete key on the keyboard to remove)
9. Find the SSNet_Client.inffile(s), right-click and select Remove
10. Find the SSNet_Client.dll file(s), right-click and select Remove
(Do NOT press the Delete key on the keyboard to remove)
11. For Windows XP / Win7 or higher version, go to C:\ WINDOWS\system32, go to Step-13
12. For Windows NTsystem, go to C:\WINNT\ system32, go to Step-13
13. Locate the file SSnet_Kernel.dll (or SSnet_Kernel),right click and select delete
14. Locate the file WebTxfrClient.dll (or WebTxfrClient), right click and select delete
15. Locate the file WebTxfrTools.dll (or WebTxfrTools), right click and select delete
16. Close all Programs and Reboot the computer
17. Go back to “How to Install Sales Simplicity Software”