Subdivision is the third level of the data structure hierarchy and can represent communities or neighborhoods. Subdivisions may or may not have multiple Phases, but must have a least one Phase.
![]()
* IF using BuiderMT as backoffice, then manually creating Division and Subdivision is NOT needed. These data will automatically be created during the “Initial Send” from BuilderMT.
The data maintained at the Subdivision level is as follows:
· Setup (Subdivision Information)
(includes Sub Tabs: Setup, Permissions, Service Providers, Virtual Topo and Dept. Defaults)
· Data Codes
(all data codes that are NOT cascaded from the Builder and Division Levels)
· Follow-Up
· Contracts/Reports
· Phases
· Lots
· Floor Plans
· Plan Options
· Lot/Plan Matrix
· Workflow
How to Manually Create a Subdivision
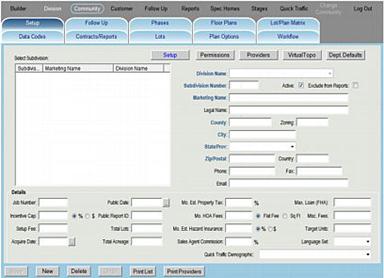
Step 1 – Manually Create a Subdivision
1. Click the Subdivision section > Setup tab > Setup sub tab
2. Click the New button
3. Select a Division Name (to attach the subdivision to) from the drop-down list
4. Type a unique Subdivision Number (required)
5. Type the Subdivision Marketing Name (required)
6. Fill-in all other appropriate information (bolded blue fields are required)
7. When complete, click the Save button
Step 2 – Set Up Detail Settings
Detail |
Description |
o Job Number |
Job number assignment specific to the selected subdivision (as necessary) |
o Incentive Cap |
Establishes a specific limit to the total of all incentives that can be offered for the selected subdivision, per sale (incentive cap applies to the sum of all four (4) incentives – Price, Lot, Option, and Upfront Cost) |
o Setup Fee |
Used to display a fee – mergeable into Word Contracts |
o Acquire Date |
Date when the parcel of land was acquired |
o Public Date |
Date when the parcel of land was registered to the city |
o Public Report ID |
Identification of the official report showing the parcel of land registered to the city |
o Total Lots |
Total number of lots within a subdivision |
o Total Acreage |
Total land acreage of a subdivision |
o Est. Property Tax |
Estimated Property Tax in % value (used in monthly payment calculation) |
o HOA Fees |
Monthly Homeowners Association (HOA) fee (used in monthly payment calculation) |
o Est. Hazard Insurance |
Estimated Hazard Insurance in % or $ value (used in monthly payment calculation) |
o Sales Agent Commission |
Used to establish Sales Agent Commission in % value (used only when all sales agent commissions are uniform within the subdivision) |
o Max. Loan (FHA) |
Used to display the FHA maximum loan amount within a subdivision |
o Misc. Fees |
Used to display a fee mergeable into Word Contracts |
o Target Units |
Used with the Dashboard. Number of homes/lots/units that should sell per Subdivision |
o Language Set |
The Language to be used per subdivision. If blank, then the default Language set will be used in that subdivision. |
o Quick Traffic |
Used to display specifically defined demographics in Builder > Field Labels. If blank, the screen will be blank when “Quick Traffic” is clicked. |
Step 3 – Set Up Permission and Misc Settings

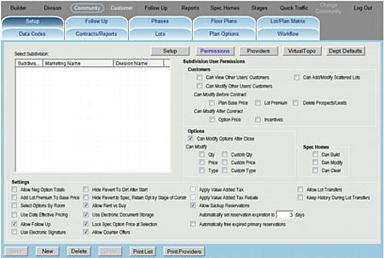
1. Click the Subdivision section > Setup tab > Permission sub tab
2. Select a Subdivision from the list view
3. Set up permission levels and modify accordingly by þor o
4. When complete, click the Save button
![]()
* The “Permissions for Users Logged into this Subdivision” are permissions that are applied to any user that logs-in to the selected subdivision and can be used to increase a users permission, but will NOT decrease a users permission
* “Settings” affect the behaviors of the various tabs and functions within each subdivision
Permission and Settings Description
Permission |
Description |
o Allow Negative Option Totals |
IF þ, the total amount of selected options - (minus) option incentive is a negative amount, then the full negative amount is applied to the total price of the home, effectively lowering the total purchase price.
IF ¨, any negative option total amount is bypassed in the total price of the home, and zero is used instead |
o Add Lot Premium To Base Price |
Automatically add the Lot Premium to the Plan Price and does NOT display the Lot Premium (as a separate line item amount) in the Customer section – Total Price Breakdown column |
o Select Options By Room |
Enable selection of options on a room-by-room basis |
o Use Date Effective Pricing |
Enable ‘Date Effective Pricing’ in Subdivision > Floor Plans, which is used to schedule future price changes of a Subdivision-Floor Plan |
o Allow Follow Up |
Enable Follow-Up section within a subdivision |
o Use Electronic Signature |
Allow use of electronic signature pad for contracts within a subdivision |
o Hide Revert To Dirt After Start |
Hide the ‘Revert Lot Back to Dirt’ cancellation method when canceling a contract in Customer > Contracts |
o Hide Revert to Spec, Retain Opt by Stage of Construction |
Hide ‘Revert to Spec, Retain All Options by Stage of Construction’ canceling method when canceling a contract in Customer > Contracts |
o Allow Rent vs Buy |
Enable Customer > Rent vs. Buy tab within a subdivision |
o Use Electronic Document Storage |
Enable tracking (document snap shot) of contracts when printed in Customer > Contracts |
o Lock Spec Option Price at Selection |
When þ, will lock the prices of options selected for a Spec Home and any changes to inventory option pricing will have no effect on the options selected for a Spec. Any option price changes made directly on the Spec will remain on the Spec, instead of being updated from inventory |
o Allow Counter Offers |
Allows the use of the Counter Offer feature within the selected subdivision |
o Apply Value Added Tax |
Applies a VAT/GST tax to all customers within the Subdivision that meet the requirements. (The VAT/GST tax is setup on the Builder tab – See Section 6.0) |
o Apply Value Added Tax Rebate |
Applies a VAT/GST tax minus a rebate to all customers within the Subdivision that meet the requirements. (The VAT/GST tax is setup on the Builder tab – See Section 6.0. This permission can only be enabled when the ‘Apply Value Added Tax’ permission is enabled.) |
o Allow Backup Reservations |
Allows backup reservations to be created on Sold and/or Reserved Lots. |
Automatically set reservation expiration to _______ days |
Auto-fills the Expiration date on Reservations to the entered number of days from the Reservation Date. |
o Automatically free expired primary reservations |
Frees the primary reservations at end of day on the Expiration Date. (Users will only be informed that primary reservations have expired if the workflow process for Lot Reservation Expired is set up at the Builder, User, Division and/or Subdivision level. If backup reservations are enabled and due to expire, then they will need to be manually freed.) |
o Allow Lot Transfer |
Ability to transfer a “Buyer” from one lot to another lot without having to cancel their contract
- Limited to a lot that’s in “Available” status and not “Spec” - Lot must also allow the buyer’s selected floor plan (from original contract) |
o Keep History During Lot Transfer |
- IF þ, this feature will maintain the buyer selected options and option attributes history
- IF ¨, this feature will only transfer the buyer selected options and option attributes. All “Change Orders” prior to option selection will NOT be transferred |
o Allow Duplicate Options |
IF þ, allows the ability to select the same non-custom option more than once. (Custom options must remain unique and are not allowed to be duplicated). When sales agents use the "Select all Standard" feature to select all standard options, options will NOT be duplicated if one of those standard options already exists. Duplicate options is allowed at both the Customer and Spec Homes (Inventory) levels.
The default setting is ¨ (no duplicate options allowed) |
Permissions for Users Logged into this Subdivision |
|
Customers: |
|
o Can View Other User’s Customers |
Ability to view (but NOT modify) another Sales Agent’s customer record |
o Can Modify Other User’s Customers |
Ability to view and modify another Sales Agent’s customer record |
o Can Add/Modify Scattered Lots |
Ability to add/modify a scattered lot to a customer record in Customer > Lots and Plans (i.e.: Scattered Lot is a lot originally owned by the customer) |
Can Modify BEFORE Contract: |
|
o Plan Base Price |
Ability to modify the plan base price for a customer – before taking the customer to contract |
o Lot Premium |
Ability to modify the lot premium for a customer – before taking the customer to contract |
o Delete Prospects/Leads |
Ability to delete a customer with a status of prospect or lead (limited to customer with NO paid deposits) |
Can Modify AFTER Contract: |
|
o Option Price |
Ability to modify the price of a selected option – after taking the customer to contract |
o Incentives |
Ability to modify any incentive(s) offered to the buyer – after taking the customer to contract (ie: Price Incentive, Lot Premium Incentive, Option Incentive, Upfront Costs Incentive) |
Options: |
|
o Can Modify Options After Close |
Ability to select, remove, or modify the option selections of a buyer – after the sale has closed (limited by Stage of Construction Cutoffs, where applicable) |
Can Modify: |
|
o Qty |
Ability to modify the quantity of a selected option |
o Price |
Ability to modify the price of a selected option |
o Type |
Ability to modify the payment type of a selected option (i.e.: available payment types – Cash, Finance, Standard) |
o Custom Qty |
Ability to modify the quantity of a requested custom option |
o Custom Price |
Ability to modify the price of a requested custom option |
o Custom Type |
Ability to modify the payment type of a requested custom option (i.e.: available payment types – Cash, Finance, Standard) |
Spec Homes: |
|
o Can Build |
Ability to create a Spec home |
o Can Modify |
Ability to modify a Spec home |
o Can Clear |
Ability to remove the plan and options from an existing Spec home |
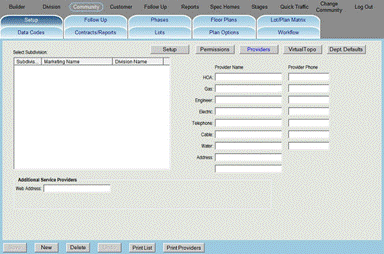
Step 4 – Set Up Service Providers
1. Click the Subdivision section > Setup tab > Service Providers sub tab
2. Select a Subdivision from the list view
3. Type the Service Provider Name and Phone Number in each field
4. When complete, click the Save button
![]()
* To create additional fields in Service Providers, go to Builder > Field Labels and select Subdivision - Setup-Service Providers

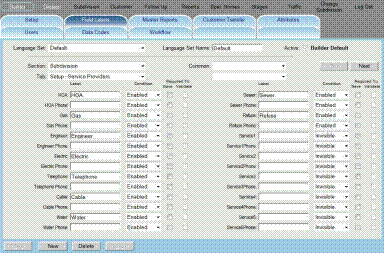
Step 5 – Add more Informational Fields in Service Providers
1. Click the Builder section > Field Label tab
2. Select a Subdivision > Setup – Service Providers from the drop-down list
3. Determine which type on information to display and/or track
4. Fill-in the information starting from Service1 and Service1 Phone, and so on…
5. Change Condition to Enabled
6. When complete, click the Save button
7. then, click the Subdivision section > Service Provider subtab
8. Fill-in the (new) additional Service Provider information and check all other appropriate information (as necessary)
9. When complete, click the Save button
Deleting an entire subdivision is quite involved and irreversible, but sometimes necessary. A designated System Administrators is allowed to delete entire subdivision and all data associated. That includes, but not limited to, all lots, data codes, floor plans and options, in addition to all customers within that subdivision and their related information, and all subdivision -related follow-up.
To delete a Subdivision simply log-in to any subdivision (including the one to be deleted), go to the Subdivision > Setup tab. Select the subdivision that is to be deleted, and click the Delete button.
There are a couple of alert notifications in place to help protect the system administrator from accidently deleting a subdivision. The system administrator will first have to confirm to proceed with the delete.
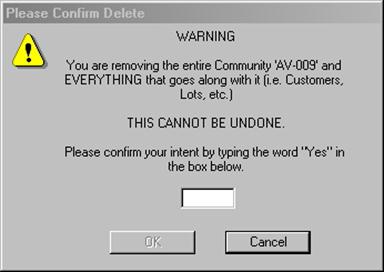
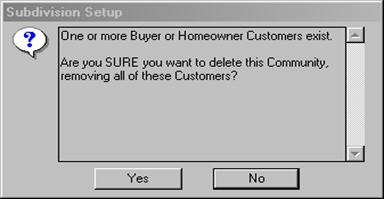
The system administrator confirms the delete command by typing “Yes” in the box. Once confirmed of the delete, there are additional precautionary step where the system administrator will check for existing Buyers or Homeowners within this community. If there are any, another warning prompt will appear.
The deleting of subdivision should be strictly reserved for system administrators only! This tab is primarily used by system administrators and all other users should not be granted access to it. However, if another type of user needs access to the Subdivision section > Setup tab but not have the ability to delete a subdivision, their access should be set up as View Only.