Follow Up – CRM Suite
(To Do’s, Emails, and Appointments)
Release Version 12.1
CONTENTS
Enable and Configure Sales Simplicity’s CRM Suite
How to Enable the New CRM Suite
How to Configure Email Settings
To Configure Builder Level SMTP Outgoing Mail
To Configure Specific User SMTP Outgoing Mail
To Configure Specific User SMTP Incoming Mail
How to Perform Scheduled Tasks
To Change the View in the To-Do List
How to View and Respond to eMails
To View and Respond to an Email
How to View Multiple Types of Task Events
To View the Recent Interactions
To View the Customer Contact Information
How to Create and Schedule a Custom Task
To Create and Schedule a New Task
To Create and Schedule a New Appointment
Enable
and Configure Sales Simplicity’s CRM Suite
The following section provides instructions on how to setup and enable the new CRM feature.
There are two options with regard to enabling this new feature:
o Assign the previous To Do tab to the new CRM Suite tab, or
o Create another CRM Suite tab, which allows for toggling between the previous version of To-Do and the new version of To-Do.
How to Enable the New CRM Suite
The Tab Customization feature allows the administrator to create and re-arrange the tabs under each section. Furthermore, it also allows the administrator to incorporate independent websites onto a single tab.
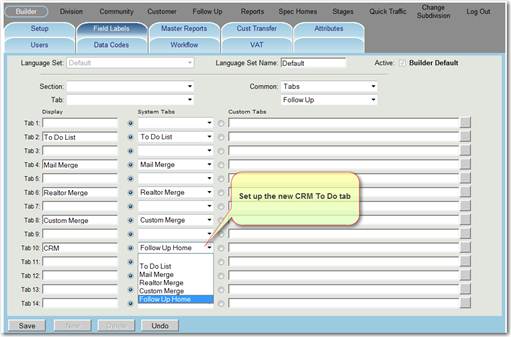
1. Under the Builder section on the Field Label tab, use the Common drop-down and select Tabs from the list.
2. From the lower drop-down list, select Follow-Up.
3. IF RE-ASSIGNING the previous To Do to the new CRM Suite, find the tab “To Do List”. Change the System Tabs selection to CRM Suite.
4. IF CREATING a new CRM Suite tab,
a. Choose any tab location (for example, Tab 10) and enter a one- or two-word description for the new CRM Suite tab (for example “New To Do” or “CRM Suite”.
b. Select the System Tab called “CRM Suite” from the drop-down list.
5. When complete, click Save.
How to Configure Email Settings
Before the email portion of the CRM Suite can be used, the Incoming Mail Settings for each user must be established. Outgoing SMTP Mail Settings do not have to be set up per user, as the Builder SMTP Settings will be used as the default. If the Builder SMTP Settings have not yet been established, the instructions follow. Otherwise, skip down to How to Configure Specific User SMTP Incoming Mail.
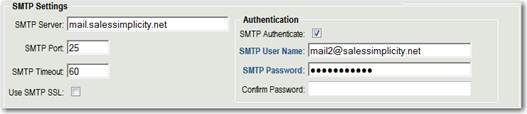
To Configure Builder Level SMTP Outgoing Mail
On the Builder > Setup tab, there is an area labeled SMTP Settings. These settings are similar to the email settings in Outlook or any other local installed client base mail program.
SMTP settings can be defined at two locations:
· Builder > Setup
· Builder > Users > Mail Settings
Builder > Setup is the default SMTP settings, which allows users to send all emails through Sales Simplicity’s mail server. This setting should work for every user and does not need to be changed unless there is an issue (i.e. if your IT Staff wants to use more spam-friendly settings that are unique for your business).
Builder > Users > Mail Settings is utilized to setup and configure custom SMTP settings per user for outgoing and/or incoming mail.
Label |
Description |
SMTP Server |
The mail server address from which mail will be sent. |
SMTP Port |
This controls the port for which incoming mail connections will be accepted. The standard SMTP port setting is 25. |
SMTP Timeout |
The maximum number of seconds that may elapse while waiting for a response from the recipient’s server. |
Use SMTP SSL |
Secure Sockets Layer (SSL) is a method for transmitting private messages via the Internet. Check this if your server uses this extra layer of security when sending messages. |
Authentication information is used to identify you as a valid user to the server from which mail messages are being sent.
Label |
Description |
SMTP Authenticate |
Checking this enables authentication. This will ensure only connections which give the correct user name and password are allowed to send outgoing emails. |
SMTP User Name |
The email address to use for authentication. |
SMTP Password |
The password to use for authentication. |
NOTE: For builders that self-host Sales Simplicity on their server, it is highly recommended to configure the SMTP settings using your Exchange Mail Server, due to firewall constraints. Check with your email administrator to ensure emails are setup accordingly.
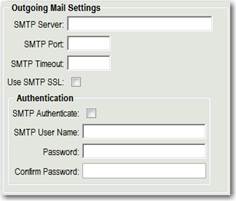
To Configure Specific User SMTP Outgoing Mail
On the Builder > Users > Mail Settings tab, there is an area labeled Outgoing Mail Settings. If the user needs to have different settings than the Builder’s default, they would be entered here. See How to Configure Builder Level SMTP Outgoing Mail above for an explanation of each field.
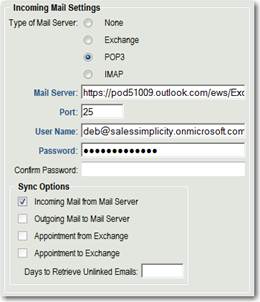
To Configure Specific User SMTP Incoming Mail
The Incoming Mail Settings for each user must be established in order to receive emails into Sales Simplicity and maintained on the new CRM Suite tab. These settings are entered on the Builder > Users > Mail Settings tab, in the area labeled Incoming Mail Settings.
Each field is described below.
Label |
Description |
Type of Mail Server |
Select the type of mail server standard Internet application-layer protocol used by local e-mail clients to retrieve e-mail from a remote server over a TCP/IP connection. |
Authentication information is used to identify you as a valid user to the server from which mail messages are being sent.
Mail Server |
HTML link of the Incoming Mail Server Name |
Port |
This controls the port for which incoming mail connections will be accepted. The standard SMTP port setting is 25. |
User Name |
The email address to use for authentication. |
Password |
The password to use for authentication. |
Confirm Password |
Re-confirm password to use for authentication. |
Sync Options |
Select features |
The following section provides instructions for performing administratively scheduled tasks and for creating custom tasks in Sales Simplicity.
The Sales Simplicity Follow-Up has two (2) functional features:
o Execute Task screen
o Action Task screen
Execute Task screen - allows for PERFORMING:
o Administratively Scheduled Tasks
o Scheduled Personal Custom Tasks
o View scheduled Appointments
o View and Respond to customer Emails
Action Task screen - allows for CREATING:
o Custom Scheduled Tasks
o Schedule an Appointment
o Schedule a New Letter task
o Customer Notes
o Return to Follow-Up – Execute Task screen
o Return to Customer – Buyer screen
How to Perform Scheduled Tasks
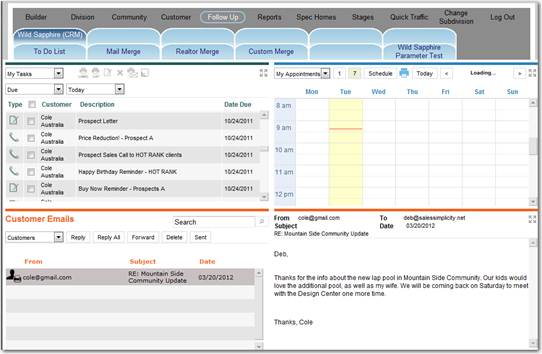
The execute To Do feature allows the logged in user to view and perform administratively scheduled tasks for all customers.
Icon legend representing TYPE of tasks to perform:
|
Call task |
|
Letter task |
|
Email task |
|
Other task |
Icon legend representing ACTION to be conducted for a listed task(s):
|
Print Label of the selected customer(s) |
|
Print Task List of the selected task(s) |
|
Print Letter of the selected task(s) -or- Mark Task as Complete of the selected task(s) |
|
Remove / Delete of the selected task(s) |
|
Send via Email of selected letter(s) |
|
Include Customer Note in a selected letter task |
To Change the View in the To-Do List
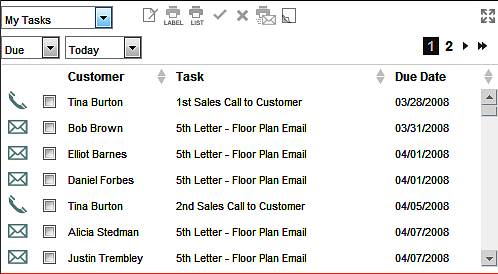
1. Click the Follow-Up section
2. Click the CRM Suite tab
3. Select how to view the To Do List tasks:
o Select … My Tasks, oranother Agent Name
o Due when … Today, or
o Due when … Other Date, then specify To and From dates
o Due when … All, or
![]()
* NOTE – some screen labels may have change due to customization and/or enhancement
1 In the
To Do list view screen, locate
and select a ![]() (call)
task to perform
(call)
task to perform
2 To view the customer’s phone number, simply double click the call task row. The screen will switch to the Action screen where the customer’s overall contact information will be displayed in the right column
3 When the call task is done:
3.1 - IF in the Action screen, click View All Follow-Up, then go to Step 4
3.2 - IF in the Execute screen, then go to Step 4
4 Click to
highlight the call task row -or- click the ![]() to
change to
to
change to ![]() , then click the
, then click the ![]() button to mark call
task as complete
button to mark call
task as complete
5 A pop-up window will be displayed to create a Customer Note, stating as to what transpired in the phone call conversation
6 When complete, click Save button (to save notation) or Close button (to simply close and not save any notation)
1 In the
To Do list view screen, locate
and select a ![]() (letter)
task to perform
(letter)
task to perform
2 Letter task can be executed in two-ways:
2.1 Click to
highlight the letter task row, -or- click the ![]() to
change to
to
change to ![]()
2.2 - To PRINT
the letter, click the ![]() Print Letter
Action button
Print Letter
Action button
2.3 - To EMAIL
the letter, click the ![]() Send via Email button, then click
the
Send via Email button, then click
the ![]() button to execute and mark
letter task as complete
button to execute and mark
letter task as complete
![]()
Note:
o multiple letter tasks can be accomplish by holding down the CTRL key and click to select each row
o when selecting multiple letter tasks and using Send via Email feature, all customer with email address will be send via email and customers without emails address will be sent to the printer.
1 In the
To Do list view screen, locate
and select a ![]() (email)
task to perform
(email)
task to perform
2 Click to
highlight the email task row, -or- click the ![]() to
change to
to
change to ![]()
3 Click the
![]() button to execute and mark email task as complete
button to execute and mark email task as complete
![]()
Note – multiple email tasks can be accomplish by holding down the CTRL key and click to select each row.
1 In the To Do list view screen, locate and select a customer name
2 Double click the row, the screen will switch to the Action screen
3 In the upper right column, under the customer name will display the customer’s email address
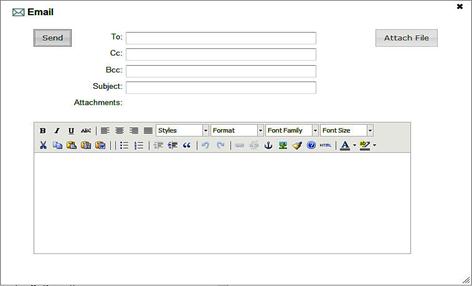
4 Click the customer’s email address and an email pop-up screen will be displayed
5 Create the email Subject and body of email
6 When complete, click the Send button
1 In the
To Do list view screen, locate
and select ![]() (other)
task to perform
(other)
task to perform
2 Click to
highlight the other task row, -or- click the ![]() to
change to
to
change to ![]()
3 Click the
![]() button to execute and mark other task as complete
button to execute and mark other task as complete
![]()
Note – multiple other tasks can be accomplish by holding down the CTRL key and click to select each row.
1 In the
To Do list view screen, locate
and select a ![]() (letter)
task(s) to perform
(letter)
task(s) to perform
2 Click to
highlight the letter task(s) row, -or- click the ![]() to
change to
to
change to ![]()
2.1 - To PRINT
LABEL(s) for the letter, click the ![]() Print
Label button
Print
Label button
![]()
Note – multiple letter tasks can be accomplish by holding down the CTRL key and click to select each row
1 In the To Do list view screen, locate and select task(s) to print
2 Click to
highlight task(s) row, -or- click the ![]() to change
to
to change
to ![]()
2.1 - To PRINT
TASK LIST for the letter, click the ![]() Print Task
List button
Print Task
List button
![]()
Note – multiple tasks can be printed by holding down the CTRL key and click to select each row
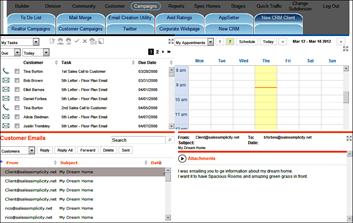
How to View and Respond to eMails
The eMail feature allows the logged in user to view and send emails to and from the user’s customers.
Icon legend representing TYPE of emails:
|
Search for type of eMails: o Customers - entered in SSS o Realtors - entered in SSS o Non-Customers - are customers that are not entered in SSS o Personal - are non-customers and personal in nature |
Icon legend representing ACTION to be conducted to an email:
|
Reply - to the sender of the existing email |
|
Reply All - to the recipients of the existing email |
|
Forward - an existing email to other recipients, which includes attachments |
|
Delete - a selected email |
|
Sent - allows viewing of historical responded emails |
|
Search - allows for finding key words related to: o Customer Name (first and last name) o Subject o Body of eMail |
|
Change Screen Mode – allows for expanding the selected section to full screen mode. By clicking the icon again, reverts the section to normal screen mode |
To View and Respond to an Email
View Email Screen
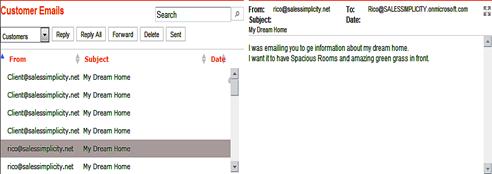
1. From the drop-down list, select an email type:
o Customers
o Realtors
o Non-Customers
o Personal
2. Click to highlight a selected email to read
3. To respond to the original sender, click the Reply button
4. To respond to all recipients, click the Reply All button
5. To forward the email (with or without attachment) to another email address (not on the list), click the Forward button
6. To remove the email, click the Delete button
The Appointment feature allows the logged in user to view scheduled appointments.
![]()
Selection for TYPE of appointments:
My Appointments |
Displays any appointments scheduled by the logged-in user, based on permitted Community(s) |
Community Appointments |
Displays any appointments scheduled by the logged-in user, based on selected Community |
User |
Displays any appointments scheduled by the selected user, limited by the logged-in user’s permitted Community(s) |
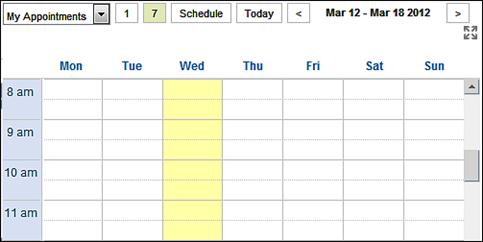
Selection VIEW of calendar:
|
Adjusts the displays to a 1-day calendar, based on appointment filter and selected date |
|
Adjusts the displays to a 7-day calendar, based on appointment filter and selected date |
|
Displays all Scheduled appointment, based on appointment filter and selected dates |
|
Displays Today’s scheduled appointment, based on appointment filter and selected dates |
|
Displays
the date range,
based on selected date and date filter. By clicking
|
|
Yellow vertical bar represents the current day of the week (ie: if today is Wednesday, then the highlighted yellow column will be on Wed) |
|
Full Screen Mode – allows for expanding the selected section to full screen mode. By clicking the icon again, reverts the section to default screen mode |
1 Select Appointment Type from the drop-down list
2 Select Calendar View
2.1 - Click
![]() or
or ![]() to
adjust calendar display, or
to
adjust calendar display, or
2.2 - Click
![]() to adjust calendar display, or
to adjust calendar display, or
2.3 - Click
![]() to adjust calendar display
to adjust calendar display
3 Click ![]() to view previous or future appointment dates
to view previous or future appointment dates
4 Click ![]() to expand or revert back screen mode
to expand or revert back screen mode
The following section provides instructions in creating Custom Task in Sales Simplicity.
The Sales Simplicity Follow-Up has two (2) functional features:
o Execute Task screen
o Action Task screen
Execute Task screen - allows for PERFORMING:
o Administratively Scheduled Tasks
o Scheduled Personal Custom Tasks
o View scheduled Appointments
o View and Respond to customer Emails
Action Task screen - allows for CREATING:
o Custom Scheduled Tasks
o Schedule an Appointment
o Schedule a New Letter task
o Customer Notes
o Return to Follow-Up – Execute Task screen
o Return to Customer – Buyer screen
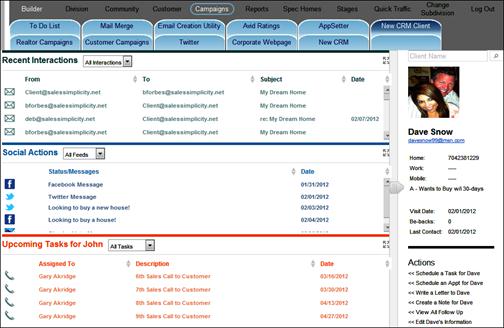
How to View Multiple Types of Task Events
The action To Do feature allows the logged in user to view event types, based on permitted Community(s).
To View TYPE of Events:
Recent |
Displays any completed customer interaction, based on permitted Community(s). The view of completed tasks can be selected by: |
|
|
o All Interactions o Appointments o Phone Calls o Emails |
o Letters o Notes o Others
|
Social
|
Displays any social network feed that is currently pre-configured in Follow-Up: o All Feeds o Facebook o Twitter |
Upcoming Tasks |
Displays any incomplete and future customer tasks, based on permitted Community(s). The view of outstanding tasks can be selected by: |
|
|
o All Tasks o Appointments o Phone Calls o Emails |
o Letters o Others
|
![]()
Note –
![]() allows
for expanding the selected section to full screen mode. By
clicking the icon again, reverts the section to default screen mode
allows
for expanding the selected section to full screen mode. By
clicking the icon again, reverts the section to default screen mode
To View the Recent Interactions
1 In the Recent Interactions section
2 From the drop-down list, select from:
o All Interactions
o Appointments
o Phone Calls
o Emails
o Letters
o Notes
o Others
3 Double click a row item to view the information
4 A pop-up screen will display the information and depending on type of event, a response can also be generated
1 In the Social Action section
2 From the drop-down list, select from:
o All Feeds
o Facebook
o Twitter
3 Each row item display the message that was originally generated from the social network site (all items in the list is for viewing purposes only)
1 In the Upcoming Task section
2 From the drop-down list, select from:
o All Tasks
o Appointments
o Phone Calls
o Emails
o Letters
o Others
3 Each row item display any incomplete and future tasks (all items in the list is for viewing purposes only)
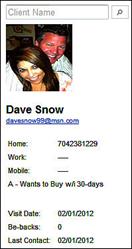
To View the Customer Contact Information
1 In the upper right column provides contact information of the selected customer
2 - To
Search for another
customer, type the customer’s first and last name, then click
3 - To send a customer a new email, click the customer’s email address and an email pop-up screen will be displayed. Simply type the email Subject and body of email, when complete, click the Send button 4 - To call the customer, the Home, Work, and Mobile numbers will be displayed
5 Additional customer information includes, Ranking, Visit Date, Be-Backs, and Last Contact date |
|
How to Create and Schedule a Custom Task
The action To Do feature allows the logged in user to create personally scheduled custom tasks for all customers.
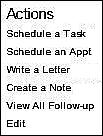
To create TYPE of task:
Schedule |
Allows for scheduling and creating a new custom Tasks for the selected customer |
Schedule |
Allows for scheduling and creating a new Appointment for the selected customer |
Write |
Allows for impromptu creation of a new Letter for the selected customer |
Create |
Allows for creating a new Note for the selected customer |
View |
Allows for switching to the execution screen to perform Follow-Up Tasks, view Appointments, and eMails |
Edit |
Allows for toggling to the Customer > Buyer record screen for the selected customer |
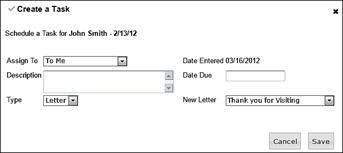
To Create and Schedule a New Task
|
|
1 In the Actions section
2 Click Schedule a Task
3 A Create a Task pop-up screen will be displayed
4 - To assign the task to another user, click the Assign To drop-down list and select another user
5 - To create a task Description, type the purpose of the task
6 - To select the Type of task, click the drop-down list and select from:
o Letter
o Call
o eMail
o Other
7 - To assign a Date Due, click the date field to display the calendar
8 - To select a pre-generated letter template, click the New Letter drop-down list and select the appropriate letter
9 - To create a new letter, click the New Letter drop-down list and select new letter
10 When complete, click the Save button
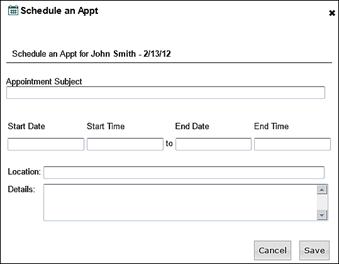
To Create and Schedule a New Appointment
|
|
1 In the Actions section
2 Click Schedule an Appt
3 A Schedule an Appt pop-up screen will be displayed
4 - In the Appointment Subject, type an appointment description
5 - To assign a Start Date, click the date field to display the calendar
6 - To assign a Start Time, click the time field to display the calendar
7 - To assign a End Date, click the date field to display the calendar
8 - To assign a End Time, click the time field to display the calendar
9 - To enter a Location, type the appointment location
10 - To enter Details, type the details of what needs to be covered during the appointment
11 When complete, click the Save button
|
|
1 In the Actions section
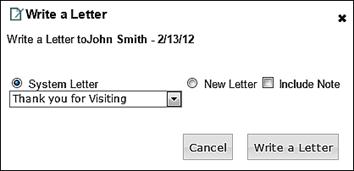
2 Click Write a Letter
3 A Write a Letter pop-up screen will be displayed
4 - To select a pre-generated letter template, click the System Letter radial button and from the drop-down list and select the appropriate letter
5 - To create a new letter, click the New Letter radial button
6 - To include a note from Customer Note in either the System Letter or New Letter, click the Include Note radial button
7 When complete, click the Write a Letter button
|
|
|
|
|
|
1 In the Actions section
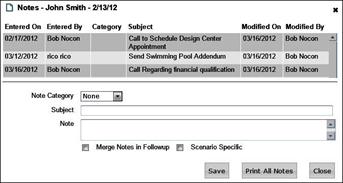
2 Click Create a Note
3 A Notes pop-up screen will be displayed, which also displays a list of all existing notes for the selected customer
4 - To print all customer notes displayed in the upper area, select Print All Notes
5 - To categorize the new note, in the Note Categorydrop-down selection (if configured accordingly), select a category
6 - In the Subject, type the note subject topic heading
7 - In the Note, type the body of the note
8 - To include the body of the note in a Follow-Up Letter, select Merge Note in Follow-Up
9 - To indicate the new Note to a specific customer scenario, select Scenario Specific
10 When complete, click the Save button
|
|
1 In the Actions section
2 Click View All Follow-Up
3 This action allows for switching to the execution screen to perform Follow-Up Tasks, view Appointments, and eMails
|
|
1 In the Actions section
2 Click Edit
3 This action will take the logged-in user to the Customer > Buyer record screen for the selected customer