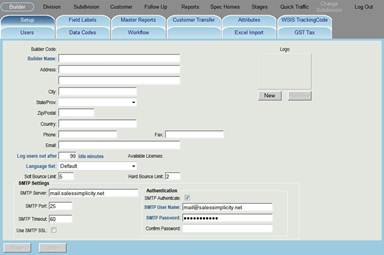
Builder is the highest level of the data structure hierarchy and in the Setup tab, provides information as to the following:
· Builder Information
· User Login Idle Minutes
· Language Set
· Email Bounce Limit
· SMTP Settings
Log
users out after ![]() idle minutes
is a time limit from which when the user logs-in and to when Sales Simplicity
will automatically log the user out. The Idle
Minutes reset’s when a user saves a record.
idle minutes
is a time limit from which when the user logs-in and to when Sales Simplicity
will automatically log the user out. The Idle
Minutes reset’s when a user saves a record.
Step 1 – Set Up Idle Minutes
1. Determine and type the minutes in the Idle Minutes field
2. When complete, click the Save button
How to Create a New Language Set
The Full Language Independence can be customized at the Subdivision level by creating new Language Sets. A Language Set contains a copy of all the Builder Default Field Labels from within Sales Simplicity. There are no limits to the number of Language Sets that can be created. Language Sets are easy to create and can be defined as the default Language for the Builder and/or each Subdivision.
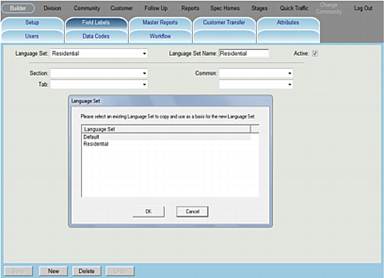
Step 1 – Create a New Language Set
1. Click the Builder section and Field Labels tab
2. Click the New button
3. Enter a Language Set Name
4. If more than one language set exist, then select a Language Set to copy from
5. Click OK
6. Click the þ Active box
7. When complete, click the Save button

Step 2 – Assign the language set at the Builder level (optional)
1. Click the Builder section and Setup tab
2. In the Language Set, select the new language set from the drop down list
3. When complete, click the Save button

Step 3 – Assign the language set at the Subdivision level
1. Click the Subdivision section and Setup tab, then select Setup subtab
2. In the Language Set, select the new language set from the drop down list
3. When complete, click the Save button
How to Set Up Email Bounce Back
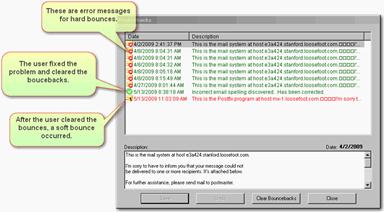
The email bounce back feature allows the user to view and manage Sales Simplicity emails that were NOT sent successfully. An email that never arrives in the recipient’s inbox and is sent back with an error message is referred to as having been bounced back.
When an email is sent and gets bounced back, the user may view the errors associated with the bounce-back and clear them when the problem has been corrected.
· Hard Bounce email error is when an email has not been accepted by the recipient’s mail server or that server does not exist and the email address has to be corrected.
· Soft Bounce email error is when an email is returned after being accepted by the recipient’s mail server, but did not reach the intended recipient (perhaps the recipient’s mailbox was full) and the user needs to have the recipient fix the problem before resuming email communications.
An administrator can reset the Soft Bounce Limit and the Hard Bounce Limit. When these limits are reached, NO more emails will be sent out to the intended recipient.

Below is the default Bounce Limits set up in Sales Simplicity:
· Hard Bounce Limit = 2 (per individual email address)
· Soft Bounce Limit = 5 (per individual email address)
Step 1 – Set Up eMail Bounce Limits
1. Identify the parameters for:
- Soft Bounce Limit
- Hard Bounce Limit
2. Type-in the parameter information
3. When complete, click the Save button
Example 1: Email Address: “scott@salessimplicity.net”
Scott’s email is VALID, but his mailbox is full. Every time an email is sent from Sales Simplicity, a soft bounce message will be created. After 5-emails have been sent to Scott, the Sales Simplicity mail server will stop all emails sent to this email address.
Example 2: Email Address: “scott@salessimple.nt”
Scott’s email address is NOT VALID. Whenever an email is sent to Scott, a hard bounce message will be generated. Once there have been 2-hard bounces, the Sales Simplicity mail server will prevent any more emails from being sent to this address.
The user will be able to clear all of these bounces and correct the email address if necessary, so that emails may be sent again.
How to Manage Email Bounce Back
Bounce Backs from Workflows
When an administrator sets up a workflow and has the workflow sent to one or more of the following email addresses:
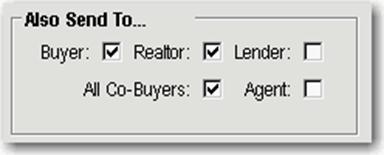
(Buyer, Realtor, Lender, Co-Buyers, and/or Agent), if the erroneous address was either the Buyer’s, Co-Buyer’s or Realtor’s email, the bounce back can now be viewed on the Buyer’s tab, Co-Buyer’s tab or Realtor’s tab respectively.
If the erroneous address was either the Lender’s or the Agent’s email or any of the emails in the email address list, there will be one bounce back created that contains all of these bad emails. These bounce backs can be viewed and managed on the workflow where it was set up
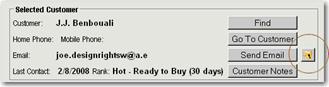
Emails that have bounced can be viewed and managed. There is a new picture button which when clicked pops up a window allowing the user to view all bounce-back messages. If there have never been any bounce-backs, the button will not be visible.
Depending on how the email was sent, the locations where the user can manage the bounce-backs are as follows:
Bounce Backs from Specific Screens
eMail Sent From |
Screens |
Customer > Buyer |
|
Division > Realtor/Broker |
|
Follow-Up > To Do List |
|
The three different types of icons images:
|
Signifies that there have been some emails bounced
back,
|
|
Signifies either the soft or hard bounce limit
has been reached,
|
|
There were bounce-backs,
|
When one of this buttons is clicked, a window will pop up displaying all the bounce-back messages sent from the mail server.
Each time an email was rejected and bounced back; there will be an error message. These error messages are displayed in a list, and are identified by hard bounces and soft bounces.
The
hard
bounce error
messages will be identified by the ![]() icon, which
typically means that the email address is not valid
icon, which
typically means that the email address is not valid
The
soft
bounce error
messages will be identified by the ![]() icon, which
means that the email message went as far as the recipient’s mail server,
but bounced back undelivered before it reached to the intended recipient. In
other words, the email address was valid, but some other condition prevented
the recipient from receiving it, like their email box is full.
icon, which
means that the email message went as far as the recipient’s mail server,
but bounced back undelivered before it reached to the intended recipient. In
other words, the email address was valid, but some other condition prevented
the recipient from receiving it, like their email box is full.
To view the entire details of an error message, click on it and the full message will appear in the text box below the list. Users will want to clear bounce-backs because once the pre-defined limits have been reached, emails to this address will not be sent out. To correct the bounce problems, users must first confirm that the email address is correct.
After the
problem has been corrected, the user will want to clear the bounce errors
(i.e.
mark them as “OK”) by simply clicking
the Clear
Bounce Backs button. They
must type in a description of why they are clearing the bounce-backs,
and then click Save. The
Clear
description
will appear in the list identified by the ![]() icon. All
bounce backs prior to the clear will now appear in green, indicating it’s
been cleared.
icon. All
bounce backs prior to the clear will now appear in green, indicating it’s
been cleared.
How to Set Up SMTP Email Settings
Simple Mail Transfer Protocol (SMTP) settings are instructions for sending email messages between servers. Most email systems that send mail over the Internet use SMTP to send messages from one server to another. The default settings, which send all emails through Sales Simplicity’s mail server (though they still come from your email address), should work for everyone and does not require to be changed, unless there is a problem (or your IT Staff wants to use more spam-friendly settings that are unique for your business). Check with the individual who sets up the typical Outlook or other mail hosting accounts to see if they want these settings changed. If Sales Simplicity is self-hosted on your own server, the default settings may not work due to firewall constraints. Check with your email administrator to ensure emails will be sent.
SMTP settings allows for sending email using local computer from Follow Up > To Do List and Follow Up > Mail Merge
Label |
Description |
SMTP Server |
The mail server address from which mail will be sent. |
SMTP Port |
This controls the port for which incoming mail connections will be accepted. The standard SMTP port setting is 25. |
SMTP Timeout |
The maximum number of seconds that may elapse while waiting for a response from the recipient’s server. |
Use SMTP SSL |
Secure Sockets Layer (SSL) is a method for transmitting private messages via the Internet. Check this if your server uses this extra layer of security when sending messages. |
Authentication information is used to identify you as a valid user to the server from which mail messages are being sent.
Label |
Description |
SMTP Authenticate |
Checking this enables authentication. This will ensure only connections which give the correct user name and password are allowed to send outgoing emails. |
SMTP User Name |
The email address to use for authentication. |
SMTP Password |
The password to use for authentication. |
There is also an area labeled SMTP Settings in the Builder Setup screen. These settings are similar to the email settings in Outlook or any other mail program.

SMTP settings are defined at three locations:
· Builder > Setup (configuration settings saved in Sales Simplicity)
· Builder > Users (configuration settings saved in Sales Simplicity)
· Local Computer SMTP Settings
Builder > Setup is the default settings, which send all emails through Sales Simplicity’s mail server (though they still come from your email address), should work for everyone and does not need to be changed unless there is a problem.
Builder > User > SMTP settings are for rare occasions where users may have a unique SMTP settings which are different from the Builder > Setup settings. Check with the person who set up your email accounts to see if this is necessary.
When the SMTP settings are defined at the user level, those are the settings that will be used when sending emails from Sales Simplicity. If the user SMTP settings are BLANK, the Builder > Setup SMTP settings will be used.
Local Computer SMTP Settings is managed by Windows OS at the local computer level. When using this setting, at first initiation or execution of sending out an email, a pop-up dialog will be displayed allowing the end-user to modify the SMTP outgoing email settings used by Sales Simplicity.
Step 1 – Set Up SMTP Mail
1. Identify the parameters for each SMTP Settings:
- SMTP Server
- SMTP Port
- SMTP Timeout
- Use SMTP SSL
- SMTP Authenticate
- SMTP User Name
- SMTP Password
- Confirm Password
2. Type-in the parameter information
3. When complete, click the Save button