The following section provides a high level overview related to importation of data to Sales Simplicity using Microsoft Excel Spreadsheet.
The purpose of Excel Data Import is to provide a method in transferring large volumes of data without having to manually enter each record through the Sales Simplicity user interface. Excel templates are available for transferring the following information:
Import Type - Spreadsheet |
Description |
Division Master Plans |
For importing Plans at the Division > Master Plan level
DEPENDENCIES – Division MUST be successfully created FIRST before Division Master Plans can be imported |
For importing Options at the Division > Master Options level with mapping specification to a Subdivision, Phase, and Plan
DEPENDENCIES – Division Master Plans MUST be successfully created or imported FIRST before Division Master Options can be imported |
|
For importing Plans at the Subdivision > Plan level with mapping specification to a Subdivision, Phase, and Plan AND Division > Master Plan level
DEPENDENCIES – Division and Subdivision MUST be successfully created FIRST before Subdivision Master Plans can be imported |
|
Subdivision Plan Options (short) |
For importing a list of Options at the Subdivision level with mapping specification to a Subdivision, Phase, Plan, and Pricing
DEPENDENCIES – Division Master Options MUST be successfully created or imported FIRST before Subdivision Plan Options can be imported |
For importing Lots at the Subdivision > Lots level with mapping specification to a Subdivision, Phase, and Status
DEPENDENCIES – Division and Subdivision MUST be successfully created FIRST before Subdivision Lots can be imported |
|
For importing a list of Options with Attributes at the Builder > Attributes level with mapping specification to Option Category, Option Code, and Selections
DEPENDENCIES – Division Master Options MUST be successfully created or imported FIRST before Option Attribute can be imported |
|
For importing a list of Realty Companies at the Division > Realty Company level with mapping specification to Division, Realty Company, and several Contact Information
DEPENDENCIES – Division MUST be successfully created FIRST before Realty Company can be imported |
|
For importing a list of Realtor/Broker at the Division > Realtor/Broker level with mapping specification to Division, Realty Company, and several Contact Information
DEPENDENCIES – Realty Company MUST be successfully created or imported FIRST before Realtors can be imported |
|
For importing a list of Prospects at the Subdivision level with mapping specification to Buyer, Co-Buyer, Visit Date, Demographics, and several Contact & Misc Information
DEPENDENCIES – Division and Subdivision MUST be successfully created FIRST before Prospects can be imported |
|
For
importing a list of Prospects at the Subdivision level with mapping
specification to Multiple Customer Notes – (greater
than 2 customer notes) DEPENDENCIES – Prospects MUST be successfully created or imported FIRST before Prospect Notes can be imported |
|
Prospect Historical Follow-Up |
For importing a list of customers at the Subdivision > Plan Options level with mapping specification to Contact Type, Task Description, and Dates
DEPENDENCIES – Prospects MUST be successfully created or imported FIRST before Subdivision Historical Follow-Up can be imported |
Users (Builder > Users) |
For importing a list of Builder Users at the Builder > Users > Information level with mapping specification to the User Name, Login-ID, Password, and Misc Information |
For importing a list of Builder Users at the Builder > Users > Information level with mapping specification to the User Name and access to multiple Subdivisions
DEPENDENCIES – Users and Subdivisions MUST be successfully created or imported FIRST before User Subdivision Access can be imported |
![]()
* If the Builder is linked to a back office product, importing Lots, Plans, and Options may not be necessary
* The Excel data import can also be used to UPDATE misc. information’s, once the data exist in the Sales Simplicity database
Basic MS Excel Spreadsheet Formatting Rules
Once the Excel spreadsheet has been downloaded to the desktop, make sure the following rules are consistent:
· Never have more than one worksheet per file
· Never have any hidden rows or columns
· Never remove or hide a blank columns
· Never have
any empty row(s) within the record
(the data import will stop when the empty
row is encountered)
How to Prepare for Excel Import Process
There are four (4) basic steps to importing mass data in to Sales Simplicity:
1. Download the MS Excel spreadsheet template
2. Populate the MS Excel spreadsheet template with data
3. Initiate the import process using the Excel Import Website
4. Review and verify the imported data within the appropriate Division and/or Subdivision

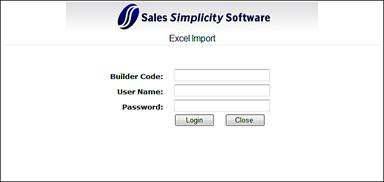
Step 1 – Log-in to the Sales Simplicity Excel Import Website
Log-in to the appropriate Sales Simplicity web URL address:
o For Self-Hosting, type - __________________________________/Excel
o For Server #1, type - www.SalesSimplicity.net/Excel
o For Server #2, type - www.SalesSimplicity.net/ssnet2/Excel
1. Enter the Code, User Name, and Password
![]()
* Optional – create a Custom TAB anywhere in Sales Simplicity

Step 2 – Download the Import Type MS Excel Spreadsheet Template
þ Download the MS Excel spreadsheet template
¨ Populate the MS Excel spreadsheet template with data
¨ Initiate the import process using the Excel Import Website
¨ Review and verify the imported data within the appropriate Division and/or Subdivision
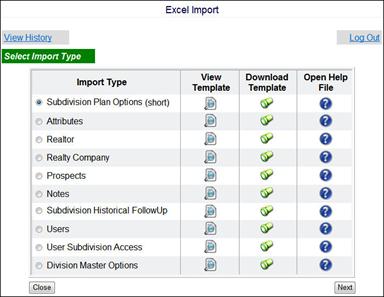
1. In the
Import Type, click to select
an item ![]() (unselected)
(unselected) ![]() (selected)
(selected)
2. To Preview the content of the MS Excel
Spreadsheet, click ![]()
3. To Download the MS Excel Spreadsheet,
click ![]()
4. To View Requirements information of
the MS Excel Spreadsheet, click ![]()
Step 3 – Populate the MS Excel Spreadsheet Template with Data
þ Download the MS Excel spreadsheet template
þ Populate the MS Excel spreadsheet template with data
¨ Initiate the import process using the Excel Import Website
¨ Review and verify the imported data within the appropriate Division and/or Subdivision
How to Initiate the Import Process
Step 1 – Log-in to the Sales Simplicity Excel Import Website
þ Download the MS Excel spreadsheet template
þ Populate the MS Excel spreadsheet template with data
þ Initiate the import process using the Excel Import Website
¨ Review and verify the imported data within the appropriate Division and/or Subdivision

Step 2 – Select the Import Type to Import
1. In the
Import Type, click to select
an item to import ![]() (unselected)
(unselected) ![]() (selected)
(selected)
2. Clickthe ![]() button
button
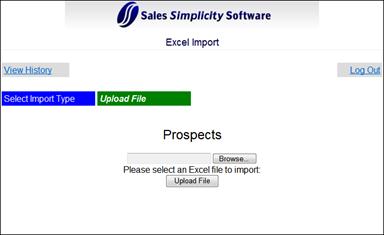
Step 3 – Upload the File to Import
1. Find the MS Excel Import file to import by clicking Browsebutton
2. When complete, click the Upload File button

Step 4 – Review and Validate the Data Prior to Importing
1. Review and Validate the data on the spreadsheet against the original MS Excel Import Spreadsheet to minimize error prior to starting the import process
2. Scroll UP or DOWN / LEFT or RIGHT to view more data
3. When complete, click the Continue button (bottom)

Step 5 – Start the Import Process
1. To initiate the Import Process, click the Import Button
2. When the import process is complete, the following screen will be displayed
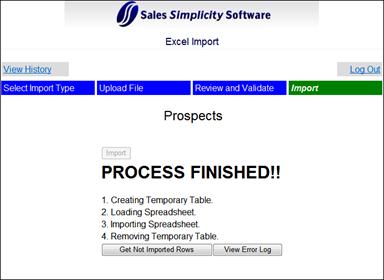
3. To view any errors generated during the import process, simply click the Get NOT Imported Rows button –and/or– View Error Log button
Step 6 – Verify the Imported Data is in Sales Simplicity
þ Download the MS Excel spreadsheet template
þ Populate the MS Excel spreadsheet template with data
þ Initiate the import process using the Excel Import Website
þ Review and verify the imported data within the appropriate Division and/or Subdivision
1. Login in to Sales Simplicity
2. Verify that the data are imported properly by checking the appropriate tabs within each Division and Subdivision